Enable Basic Authentication For RESTful Web-service
Learn how to enable Basic Authentication for your RESTful web-service
In the last post, I had explained how we can create a RESTful web service using PHP & MySQL.
In this post, I will show you how you can secure the same API using Basic Authentication. With Basic Authentication, you’ll be able to add or retrieve your To-Do’s (data) only after entering valid credentials.
Please note that these steps are based on Apache/2.4.34 running on macOS Mojave 10.14.5. Depending on your OS, your steps might vary slightly.
Steps to perform
1. Create/edit .htaccess file.
If you have copied or cloned my GitHub repo (as discussed in my last post), you will find an .htaccess file there at the root of the project.
If not, start with creating this file (at the root of your project).
RewriteEngine On    # Turn on the rewriting engineRewriteRule ^info/([a-zA-Z_-]*)$ info.php?task=$1 [NC,L]
AuthType Basic
AuthName "Restricted Content"
AuthUserFile /etc/apache2/.htpasswd
Require valid-user
As you can see above, I am specifying the AuthType & a credentials file /etc/apache2/.htpasswd. After saving this file, follow the next step.
2. Create/edit your etc/apache2/.htpasswd file.
If you haven’t created this file before, create it first. Below is how to do it.
root@shashank-mbp /U/a/S/REST-To-Do# htpasswd -c /etc/apache2/.htpasswd admin
New password:
Here, admin is the username which will be used to add/retrieve your To-Do's. Feel free to create any user.
Now enter the password twice. It will create the/etc/apache2/.htpasswd file for you with the credentials to access your API.
If this file already exists, omit the
-cparameter in the above command.-cstands for creating the file.
3. Test your API
Now try to GET or retrieve your To-Do info using either a browser or a REST client such as Postman. In the case of the browser, it will ask you to enter credentials when you enter the REST endpoint in the address bar. See the image below.

Enter the username/password you specified while creating the .htpasswd file. If your credentials are correct, you'll be able to access the API now.
If you’re using Postman, you might receive an error like below.
<!DOCTYPE HTML PUBLIC "-//IETF//DTD HTML 2.0//EN">
<html>
<head>
<title>401 Unauthorized</title>
</head>
<body>
<h1>Unauthorized</h1>
<p>This server could not verify that you
are authorized to access the document
requested. Either you supplied the wrong
credentials (e.g., bad password), or your
browser doesn't understand how to supply
the credentials required.</p>
</body>
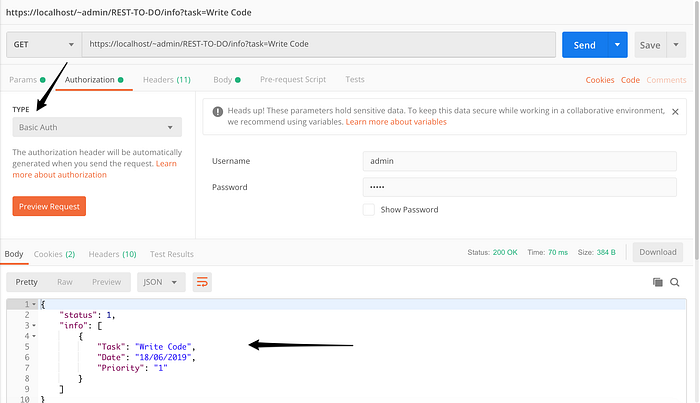
</html>It means you need to enable authentication in Postman to access your API. For this, select Basic Auth from the TYPE dropdown & enter your username/password. After this, click the Send button. You’ll see your information in the bottom pane now.
Check the below screenshot for more information.